
- Help Center
- Enscape
- If you run into issues please view the Enscape and SketchUp troubleshooting guides
- To start Enscape you first must open what SketchUp file/project you are going to use and then open Enscape from within the file
- At the top of SketchUp should be a toolbar directly related to Enscape
- If toolbar cannot be found right-click on the toolbar and select “customize tool bar” and find the escape tools and drag them to the toolbar!
- The Enscape tool bar can also be access by going to Extensions>Enscape
- Below is what the Enscape tool bar contains and each of their properties
- At the top of SketchUp should be a toolbar directly related to Enscape

| TAG | TOOL NAME | TOOL FUNCTION |
| 1 | Start Enscape | “Play Button”, Starts Enscape viewer in separate window |
| 2 | Live Updates | Toggles updates to automatically show model updates |
| 3 | Synchronize Views | Allows cameras to move in sync from SketchUp to Enscape |
| 4 | Enscape Objects | Light & sound sources (not fixtures) |
| 5 | Asset Library | People, Objects, Plants, Furniture, Fixtures, etc. |
| 6 | Material Library | Materials that are predefined within Enscape |
| 7 | Material Editor | Edit material properties already in SketchUp file or Enscape |
| 8 | Upload Management | View and manage your panoramas and web standalone |
| 9 | General Settings | Enscape settings for the overall program |
| 10 | Support | Send feedback for support here |
| 11 | About | Check which Enscape version currently using |
| 12 | Enscape Store | Takes you to chaos website for purchasing license |
| 13 | Enscape Account | Manage login & license here |
- After clicking the “Play Button” (#1 above) allow Enscape to open the model
- FYI Depending on the size of the model this may take a bit or even cause Enscape to freeze follow troubleshooting guide for help!
- Once Enscape opens check around model within Enscape to ensure model is complete (textures, faces, materials, objects etc.)
- When opening Enscape do not edit anything within SketchUp or another tab, this can cause Enscape to freeze or for the model to not load properly!
- Setup views within SketchUp (and make sure they show up in Enscape)
- View setup can be done in either Sketch or Escape but tends to be easier via SketchUp
- As a best practice it is good to setup your view slightly farther back so you can crop down the view when adding a watermark/editing in photoshop
- The view in SketchUp tends to be zoomed in compared to Enscape, keep this is mind when placing Assets/Objects
- Make sure to name and number scenes as it makes sense and is appropriate, especially if other people may be using the model for a client meeting later!
- These scenes can also be used during VR for quick transport to different areas
- When setting up views ensure there is no Z-Facing (materials fighting to be on top)
- Assign materials to model
- Within your view start to assign materials double checking their scale and color in Enscape as colors do not always match and the scale of things can get wonky when duplicating
- Editing materials can easily be done via the “Material Editor” (#7 Above)
- If you are planning on testing different materials, create separate scenes and materials for quick back and fourth testing! (ie slight color variation, material type, orientation)
- When adding materials to lights, to make them appear “on” create a new material and within the “Material Editor” change the type of material to “Self Illuminated” from there adjust the light level value, you should also add a light source asset to help illuminate the space
- Some projects may have specific finishes/graphics (check with interiors and branding) and ensure they are added in at the proper locations and scales
- Add Objects
- Within the SketchUp model add objects to your project, depending on the project phase objects may already be imported into the model (check with interiors for specifics)
- It is also best to use objects fro the Asset Library (#5 Above) native to Enscape as these will render better
- There also exists several object files found under: (Shared > Standards > Drawings _ Presentations > SketchUp > Model Assets)
- You can also easily find other objects by going to the 3d Warehouse (some objects might be too large or polygon heavy, ensure you are checking this before adding to the file)
- When adding objects create new tags and add them to it, this enables you to turn off objects when editing the model (loads things faster/quick modeling)
- People Tag
- Furniture Tag
- Plant Tag
- Misc Tag
- For more detailed renderings, add in objects for food, plates, plants, etc.(or any objects that make the space feel used and lived in)
- Within the SketchUp model add objects to your project, depending on the project phase objects may already be imported into the model (check with interiors for specifics)
- Add Lighting
- Adding light sources can be done with the Enscape Object tab (#4 Above)
- For interiors sometimes it is best to create a “blanket” of lighting using rectangular or round sources to create an even spread and then populate lighting for specific fixtures and objects within the space/model
- This really depends on the amount of “natural” light is penetrating the space
- When adding lighting to fixtures add a material to the “bulb” that is self illuminated before adding a lighting source, then adjust the material illumenance
- Below is a link to a quick video for some easy tips and tricks for placing/editing lighting
- Adjust the time of day for different sun paths/shadow
- This can be done through Enscape or SketchUp
- It is easiest to edit the shadow via the slider in SketchUp and updating the scene
- When adjusting the time of day in SketchUp it should auto adjust/update in Enscape as long as live updates are on, this will make it easier to fine tune your time and to adjust the sun angle
- Adjusting the time in Enscape is done by “Shift + Right Click” and dragging your mouse either forward to back to make time move forward or back
- You can also use the keys “U” (Earlier Time) & “I” (Later Time) for incremental changes
- Within Enscape there are two toolbars, one on the top and one top right
- Below is the top left tool bar and its functions and then the top right tool bar and its functions. (Icon and the uses in image may differ from current Enscape version)
- The top left tool bar is for views, objects, and exporting renderings
- The top right tool bar is for adjusting settings prior to rendering

| TAG | TOOL NAME | TOOL FUNCTION |
| 1 | Home Mode | Removes any pop ups and takes you back to the model |
| 2 | Collaboration | Adds notes for collaboration (not used currently) |
| 3 | BIM Mode | Shows model components (not used currently) |
| 4 | View Management | Manages created scenes (even if created via SketchUp) |
| 5 | Asset Library | People, Objects, Plants, Furniture, Fixtures, etc. |
| 6 | Site Context | Import massing of site and building (fake building heights) |
| 7 | Video Editor | Place & edit camera path for videos here |
| 8 | Veras | AI Renders for quick variation of project (not used currently) |
| 9 | Screenshot | “Render” button, renders current Enscape view |
| 10 | AI Enhance | Renders project with higher realism (not used currently) |
| 11 | Batch Render | Export multiple views at once with the same visual settings |
| 12 | V-Ray Scene Export | Exports view with V-Ray scene files |
| 13 | Panorama | Mono (Standard) or Stereo (360) panoramic views exported here |
| 14 | Exe/Web Standalone | Export project for online viewing without Enscape downloaded |
| 15 | Share Scene | Uploads Enscape scene to Chaos Cloud for sharing |
| 16 | Enscape Impact | Allows for building analysis within Enscape (not used currently) |

| TAG | TOOL NAME | TOOL FUNCTION |
| 1 | Minimap | Interactive site plan of model to move around/locate yourself |
| 2 | Safe Frame | Limit visible area to projected rendering results |
| 3 | Projection Mode | Toggles between perspective, 2-point, and orthographic |
| 4 | Navigation Mode | Toggles between fly and walk (walk with wasd) |
| 5 | VR Mode | Toggles on/off VR view seen in headset |
| 6 | Visual Settings | Adjust visual preferences for final render here |
| 7 | Enscape Window Settings (6) | Movement & mouse preferences adjusted here |
| 8 | Help | Controls & Toolbar descriptions |
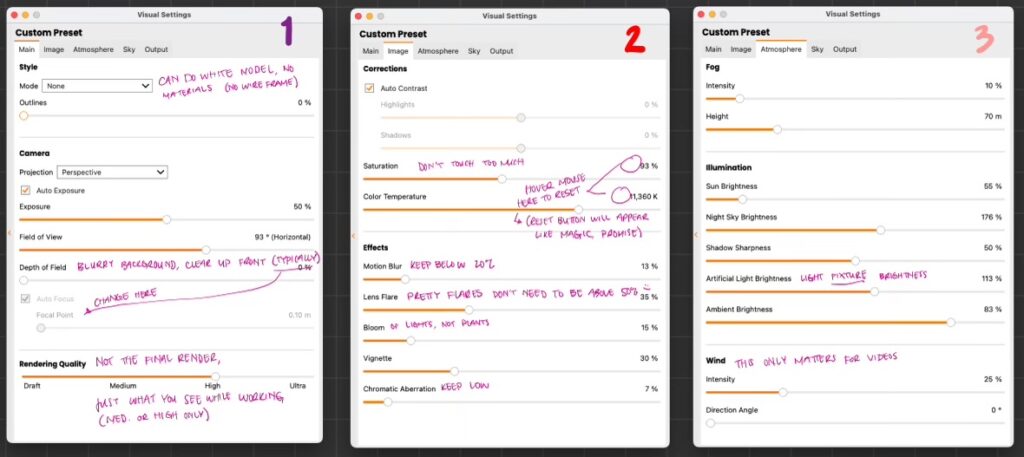
- When changing visual setting here are some standard practices to use (Tool 6 Above)
- (These settings can and should be tweaked based on the project)
- Main Tab (1)
- Model/Style
- Percentage of routines (max at 8%)
- 2-point projection
- Auto exposure turned on
- Depth of field & focal point
- Field of view (Max at 100)
- Rendering Quality (This is not the output type but how it looks when working)
- Image Tab (2)
- Auto Contrast
- Saturation (leave at 100%)
- Color Temperature (Do not touch too much)
- Motion blue, boom vignette, & chromatic aberration (keep below 20%)
- Lens flare (max at 50%)
- Atmosphere Tab (3)
- Lower fog settings only for exterior night renderings
- Sun brightness (max at 100%)
- Night sky brightness (150%)
- Shadow Sharpness (50%)
- Artificial light brightness (max at 125%, this edits light fixture brightness)
- Ambient brightness (max at 100%)
- Wind settings only matter for videos
- Sky Tab (4)
- Leave white background off unless SD or conceptual
- Horizon source (choose the most accurate background setting as this will change the sunlight conditions)
- Rotation (rotates the background if visible through any windows in rendering)
- Moon size (more important for evening/night renderings, does affect night lighting)
- Density (max 25%) (cloud size)
- Variety (max 25%) (types of clouds)
- Cirrus Amount (max 75%) (Wispy clouds)
- Contrails (max 4) (plane trails)
- Longitude/Latitude (rotates the clouds)
- Output Tab (5)
- Resolution (Full HD for presentation, Ultra HD for marketing renderings)
- Keep ID & channel maps unchecked (unless for marketing renders & photo matching to location)
- File format (PNG)
- Default folder (Always save renderings to the B56 Renderings Folder under the project)
- Keep automatic naming unchecked
- Video compression quality (maximum)
- Frames per second (60 fps)
- Panorama resolution (Medium/High)
- Main Tab (1)
- (These settings can and should be tweaked based on the project)

- Help Tab
- This can be accessed by pressing the quesiton mark icon (Tool 8 Above)
- It can also be opened by pressing “H” on your keyboard
- This tab gives information on the various controls within Enscape
- Exporting Renderings
- Before exporting, ALWAYS save the SketchUp file incase of crashes
- Double check your output settings (Some can also be updated when using the screenshot tool)
- Resolution
- Window
- 1024
- HD
- Full HD
- Ultra HD
- Custom
- When doing large renderings for client marketing a super size is 8192×4608
- A reference for this size is 25.003 – Pinnacle Construction – Horizon Apartments
- Format
- Portable Network Graphics (.png)
- JPEG Image (.jpg)
- OpenEXR (.exr) (We do not use)
- Targa File (.tga) (We do not use)
- Location
- Project Number and Name > Drawings > B56 Renderings
- Resolution
- After Exporting Renderings
- Open the Photoshop Watermark Template (size of your choosing)
- These sizes can also be changed within the file to smaller/larger
- Following the instructions within the template
- Export as a png as these are typically smaller file sizes
- Open the Photoshop Watermark Template (size of your choosing)
- For questions or troubleshooting reach out to Interiors, Verdant, or Google